Spring AOP 源码解析系列,建议大家按顺序阅读,欢迎讨论
- Spring源码-AOP(一)-代理模式
- Spring源码-AOP(二)-AOP概念
- Spring源码-AOP(三)-Spring AOP的四种实现
- Spring源码-AOP(四)-ProxyFactory
- Spring源码-AOP(五)-ProxyFactoryBean
- Spring源码-AOP(六)-自动代理与DefaultAdvisorAutoProxyCreator
- Spring源码-AOP(七)-整合AspectJ
本章来解析最基础的ProxyFactory的源码。有人会说,现在都没人用编码的方式来写AOP了,解析它有什么用呢?我想从两点强调下:
- 不论是注解还是XML配置,其底层的实现还是通过编码的方式来组建相互之间的关系。可以说ProxyFactory的基本实现就是Spring AOP抛开一切配置后真正核心的东西。
- 我理解中优秀的框架都是不断演进的,逐渐演化从而形成强大的功能。从理解简单的实现逐步到了解复杂的功能结构,才能一步步把握框架设计的思路,而这也是我们学习优秀框架的主要目的。
1.ProxyFactory类结构
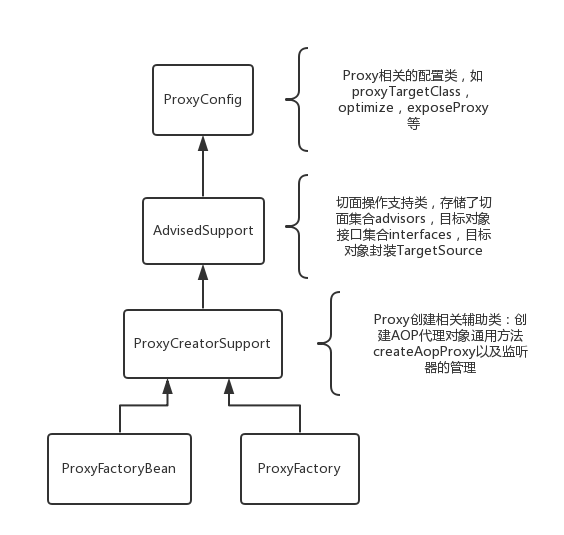
在深入源码前,我们应当对ProxyFactory的结构有一个概览,就如同读一本书,先浏览下目录结构,会对接下来的阅读大有裨益。

- ProxyConfig:代理相关的全局配置,常见的有proxyTargetClass,exposeProxy。
- AdvisedSupport:在Spring AOP中,Advisor(切面)就是将Advice(增强)和Pointcut(切入点)连接起来的东西。此类主要支持切面相关的操作。
- ProxyCreatorSupport:代理创建的辅助类,主要方法就是创建代理对象。
可以看出整个层级架构中每个类的职责很确定,符合了职责单一原则,在Spring中好的设计理念存在于点点滴滴里。
2.ProxyFactory源码解析
在上一篇AOP的四种实现里列举了ProxyFactory创建代理的Demo。
1 | public class ProxyFactoryTest { |
我们就以基于接口代理这个简单的例子来分析ProxyFactory的实现。
ProxyFactory初始化
首先,基于接口的代理需要准备的元素:
- 被代理的对象
- 代理对象要实现的接口
- 要对被代理对象实施的增强(额外操作)
Demo中的前5步都是处理准备工作
ProxyFactory的构造函数是空方法
setTarget时,将target对象封装成TargetSource对象,而调用的setTargetSource是AdvisedSupport的方法。
1
2
3
4
5
6
7public void setTarget(Object target) {
setTargetSource(new SingletonTargetSource(target));
}
public void setTargetSource(TargetSource targetSource) {
this.targetSource = (targetSource != null ? targetSource : EMPTY_TARGET_SOURCE);
}setInterfaces,赋值的也是AdvisedSupport中的interfaces属性,但是是先清空再赋值。
1
2
3
4
5
6
7
8
9
10
11
12
13
14
15
16
17
18
19
20
21
22
23
24
25/**
* Set the interfaces to be proxied.
*/
public void setInterfaces(Class<?>... interfaces) {
Assert.notNull(interfaces, "Interfaces must not be null");
this.interfaces.clear();
for (Class<?> ifc : interfaces) {
addInterface(ifc);
}
}
/**
* Add a new proxied interface.
* [@param](https://my.oschina.net/u/2303379) intf the additional interface to proxy
*/
public void addInterface(Class<?> intf) {
Assert.notNull(intf, "Interface must not be null");
if (!intf.isInterface()) {
throw new IllegalArgumentException("[" + intf.getName() + "] is not an interface");
}
if (!this.interfaces.contains(intf)) {
this.interfaces.add(intf);
adviceChanged();
}
}addAdvice方法则是直接调用AdvisedSupport,将Advice封装成Advisor然后添加到advisors集合中。
1
2
3
4
5
6
7
8
9
10
11
12
13
14
15
16
17
18
19
20
21
22
23
24
25
26
27
28
29
30
31
32
33
34
35
36
37
38
39public void addAdvice(int pos, Advice advice) throws AopConfigException {
Assert.notNull(advice, "Advice must not be null");
// 引用增强单独处理
if (advice instanceof IntroductionInfo) {
// We don't need an IntroductionAdvisor for this kind of introduction:
// It's fully self-describing.
addAdvisor(pos, new DefaultIntroductionAdvisor(advice, (IntroductionInfo) advice));
}
// DynamicIntroductionAdvice不能单独添加,必须作为IntroductionAdvisor的一部分
else if (advice instanceof DynamicIntroductionAdvice) {
// We need an IntroductionAdvisor for this kind of introduction.
throw new AopConfigException("DynamicIntroductionAdvice may only be added as part of IntroductionAdvisor");
}
else {
addAdvisor(pos, new DefaultPointcutAdvisor(advice));
}
}
public void addAdvisor(int pos, Advisor advisor) throws AopConfigException {
if (advisor instanceof IntroductionAdvisor) {
validateIntroductionAdvisor((IntroductionAdvisor) advisor);
}
addAdvisorInternal(pos, advisor);
}
private void addAdvisorInternal(int pos, Advisor advisor) throws AopConfigException {
Assert.notNull(advisor, "Advisor must not be null");
if (isFrozen()) {
throw new AopConfigException("Cannot add advisor: Configuration is frozen.");
}
if (pos > this.advisors.size()) {
throw new IllegalArgumentException(
"Illegal position " + pos + " in advisor list with size " + this.advisors.size());
}
// 添加到advisor集合
this.advisors.add(pos, advisor);
updateAdvisorArray();
adviceChanged();
}
上述的Advice都被封装成DefaultPointcutAdvisor,可以看下其构造函数
1 | public DefaultPointcutAdvisor(Advice advice) { |
Pointcut.TRUE表示支持任何切入点。
创建代理
准备工作做完了,直接通过getProxy方法获取代理对象。
1 | public Object getProxy() { |
这里的createAopProxy()返回的是AopProxy类型,方法是final,并且加了锁操作。
1 | protected final synchronized AopProxy createAopProxy() { |
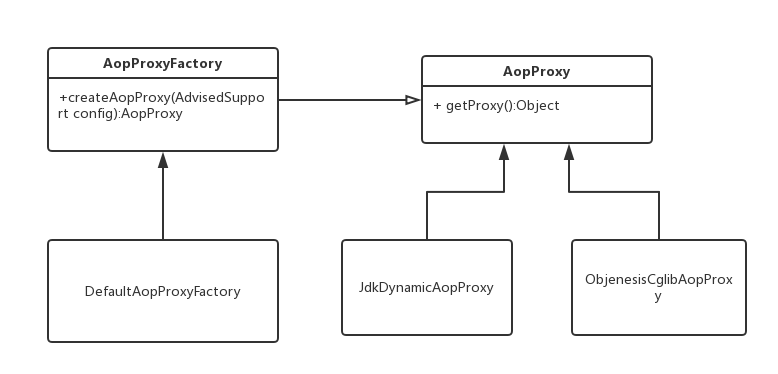
而AopProxy又是通过一个Factory工厂来创建,因为不同的外部配置决定了返回的是JDK代理还是CGLIB代理。这里涉及到两种设计模式,工厂模式和策略模式,来看一张类图。

可以清晰地看出,AopProxyFactory->AopProxy->Prxoy之间的结构。
先来看DefaultAopProxyFactory中创建AopProxy的方法
1 | public AopProxy createAopProxy(AdvisedSupport config) throws AopConfigException { |
基于外部的配置,比如设置optimize或proxyTargetClass为true,或者目标对象没有实现接口,则会返回CGLIB代理(内部有个判断targetClass是否为接口的操作,本人尝试过多种方式,除了硬编码,正常配置时都不会走),否则返回JDK代理。
对于不同的代理方式,getProxy调用的是各自内部的实现。
JdkDynamicAopProxy
JDK代理通过Proxy.newProxyInstance来实现,并且JdkDynamicAopProxy自身实现InvocationHandler代理回调接口。
1 | [@Override](https://my.oschina.net/u/1162528) |
方法调用时的回调方法invoke处理真正的代理请求
1 | public Object invoke(Object proxy, Method method, Object[] args) throws Throwable { |
在整个调用过程中,需要关注的有几点:
如果设置exposeProxy,则会设置ThreadLocal级别的currentProxy为当前执行方法的代理对象。可以在方法内使用AopContext.currentProxy()来获取代理对象。方法执行结束后,会在finally中清除currentProxy防止被误用
拦截器链的获取是一个通用方法,都是调用AdvisedSupport类,并设置了缓存以重用。
1
2
3
4
5
6
7
8
9
10public List<Object> getInterceptorsAndDynamicInterceptionAdvice(Method method, Class<?> targetClass) {
MethodCacheKey cacheKey = new MethodCacheKey(method);
List<Object> cached = this.methodCache.get(cacheKey);
if (cached == null) {
cached = this.advisorChainFactory.getInterceptorsAndDynamicInterceptionAdvice(
this, method, targetClass);
this.methodCache.put(cacheKey, cached);
}
return cached;
}
真正的调用在DefaultAdvisorChainFactory中,它实现了AdvisorChainFactory接口。通过遍历所有的Advisor切面,如果是PointcutAdvisor,则提取出Pointcut,然后匹配当前类和方法是否适用。另外通过AdvisorAdapterRegistry切面注册适配器将Advisor中的Advice都封装成MethodInteceptor以方便形成拦截器链。
1 | public List<Object> getInterceptorsAndDynamicInterceptionAdvice( |
3.链式调用,将所有元素封装成ReflectiveMethodInvocation,通过方法proceed进行链式调用
1 | invocation = new ReflectiveMethodInvocation(proxy, target, method, args, targetClass, chain); |
4.Spring对于方法返回this的流式调用也做出了兼容,将返回的this替换为代理对象。
1 | Class<?> returnType = method.getReturnType(); |
CglibAopProxy
CGLIB代理通过CglibAopProxy来实现,在Spring4.0时,封装了一个ObjenesisCglibAopProxy,它继承了CglibAopProxy。Objenesis是一个轻量级框架,可以不调用构造函数来创建对象。另外它以代理对象的className为key做了一层cache,多次生成代理时可以提高性能。
CGLIB通过Enhancer类生成字节码对象,然后创建代理对象。来看下getProxy方法
1 | public Object getProxy(ClassLoader classLoader) { |
getProxy方法是调用自CglibAopProxy类的,所做的无非就是创建Enhancer类,并配置目标对象,接口,回调类等,最后通过父类ObjenesisCglibAopProxy的createProxyClassAndInstance来创建或者返回缓存中的代理对象。对于CGLIB的原理这里就不细究了,毕竟本人也未深入了解(^__^)。我们重点关注下回调操作,通过getCallbacks方法返回的Callback集合,只用关注下DynamicAdvisedInterceptor,它即是代理实际操作的回调类,回调方法为intercept。
1 | public Object intercept(Object proxy, Method method, Object[] args, MethodProxy methodProxy) throws Throwable { |
可以发现DynamicAdvisedInterceptor的intercept方法同JdkDynamicAopProxy的invoke方法几乎相同,最后执行链式调用的CglibMethodInvocation也是ReflectiveMethodInvocation的子类。只是对一些特殊情况选择用其他的Callback来辅助实现。
3.总结
看到这里你可能觉得源码还是很复杂啊,是的,任何强大的功能的底层实现离不开对各种情况的考虑以及异常的处理等等。但是优秀的框架会把复杂的实现细节封装起来,而通过简单的架构设计向外部暴露便捷的API。因此在看源码的过程中,不仅要关注一些实现细节,更多地要关注整个架构的设计。对于Spring AOP来说,其实就是AopProxyFactory-AopProxy-Proxy三层结构,把握住这个就把握住了骨架,剩下的就是依附于骨架的血肉。
